


A Beginner’s Guide to Building Your Home Recording Studio

Creating a home recording studio has never been more accessible. When I set up my first home studio back in a cramped corner of my apartment, I was surprised by how much quality I could achieve with a relatively small investment. Whether you’re a budding singer-songwriter trying to capture your first demo, a podcaster looking to build an audience, or an aspiring producer experimenting with beats, the key is knowing exactly what you need — and avoiding the trap of buying every shiny gadget you see online.
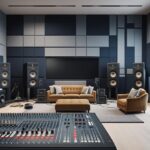
1. Choose Your Space Wisely
Your recording space is the heart of your studio. When I first started, I made the rookie mistake of setting up in my living room — which was full of glass windows and hardwood floors. The result? Everything I recorded had a weird, echoey quality I just couldn’t EQ out.
If possible, choose a small, quiet room with minimal external noise and limited reflective surfaces. Bedrooms often work surprisingly well, especially if they already have curtains, rugs, and furniture that naturally dampen sound. Avoid spaces with large windows or tile floors, as they can cause harsh reverb.
Tip from experience: clap your hands in the room. If you hear a sharp “slap-back” echo, you’ll need some sound treatment before recording.
2. Invest in Essential Gear
One of the biggest misconceptions is that you need thousands of dollars’ worth of equipment to sound professional. The truth? A few core items can get you surprisingly close. My first real jump in quality came from replacing my cheap USB mic with a proper audio interface and condenser microphone.
Here’s your starter checklist:
- Audio Interface – This is the bridge between your microphone/instrument and your computer. It improves sound quality dramatically compared to plugging in directly via USB.
- Condenser Microphone – Perfect for capturing vocals and acoustic instruments with detail and warmth.
- Studio Monitors or Quality Headphones – You need accurate playback to mix effectively. Studio monitors are ideal, but closed-back headphones are a great alternative for small spaces.
- DAW (Digital Audio Workstation) Software – This is where the magic happens. Popular beginner-friendly options include GarageBand (Mac), Reaper, and Ableton Live Lite.
When I upgraded my gear, I visited Music Planet, a store known for its friendly, knowledgeable staff. I walked in feeling overwhelmed, but left with a simple, affordable setup that I still use today.
3. Treat Your Room Acoustically
Even the best mic can’t fix bad acoustics. My early recordings had this “boxy” sound because my walls were bare. Adding a few foam panels and a thick rug instantly improved the clarity.
You don’t need a full professional acoustic treatment right away — start with the basics:
- Foam Panels to reduce high-frequency reflections
- Bass Traps for controlling low-end buildup in corners
- Rugs or Carpets to minimize floor reflections
- Heavy Curtains to block outside noise and dampen sound
If you’re on a tight budget, DIY solutions like thick blankets or bookshelves filled with books can make a noticeable difference.
4. Start Simple and Upgrade Over Time
This is the advice I wish someone had given me from the start. It’s tempting to buy every plugin, microphone, and gadget you see recommended on YouTube — but your skills matter more than your gear.
When I started, I recorded using just one condenser mic, a small interface, and free DAW software. Over time, as my mixing skills improved, I could actually hear what my next upgrade should be. That’s when I added studio monitors, a better mic preamp, and eventually built a small vocal booth.
By upgrading gradually, you spread out costs and make smarter purchases based on experience, not just hype.
Beginner’s Home Studio Budget Breakdown
| Budget Level | Essential Gear | Estimated Cost | Notes |
|---|---|---|---|
| Entry-Level | USB condenser mic, closed-back headphones, free DAW (e.g., GarageBand/Reaper trial) | $150–$250 | Great for podcasting or basic demos. |
| Mid-Range | Audio interface (Focusrite Scarlett Solo), condenser mic (Audio-Technica AT2020), studio headphones, acoustic foam kit | $400–$700 | Solid choice for singer-songwriters and content creators. |
| Pro Starter | Higher-end interface (Universal Audio Volt), large diaphragm condenser mic (Rode NT1), pair of studio monitors (Yamaha HS5), full acoustic treatment | $900–$1,500 | Ideal for serious musicians and aspiring producers. |
Pro Tip: Always budget at least 10–15% of your total for cables, mic stands, and pop filters — these little extras are essential but often overlooked.
Final Thoughts
Building your first home recording studio doesn’t have to be complicated or expensive. It’s about understanding your space, investing in the right essentials, treating your room acoustically, and growing your setup over time.
If you’re just getting started and feeling unsure, I recommend visiting a music store like Music Planet, where you can try gear in person and get advice from people who’ve been in your shoes. The right guidance early on can save you a lot of trial and error.


No comments